Hello fellow photography enthusiasts! We've decided that we're going to start offering pretty cool (and actually useful) photography tips for all of our awesome friends. Not sure how often we'll do this - perhaps once per week?
Today's quick lesson is how to use the Gradient Map feature in Photoshop for a more vivid color photograph in two super easy steps.
We're going to use a photo I took last week of Air Force One taking off from Portland International Airport. It's such an amazing airplane, and you should've seen all the massive guys with even more massive guns roaming all over the place.
Here's our starting image:

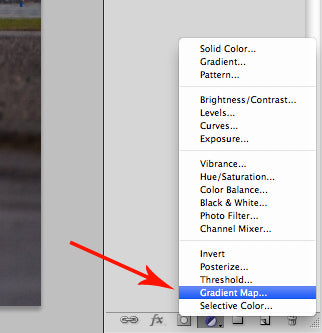
The first step: in your 'Layers' panel, select 'Gradient Map'
That will turn your image black and white, but don't panic! Step two is to turn the Blending Mode from 'Normal' to 'Luminosity'

Voila! That's it! Here's the final image:

In two very easy steps, you've just turned a flat, not very interesting photograph into a well-saturated and eye popping photo worthy of something other than the trash can :)

Photography Tip: Gradient Map for Better Color Photos
Hello fellow photography enthusiasts! We've decided that we're going to start offering pretty cool (and actually useful) photography tips for all of our awesome friends. Not sure how often we'll do this - perhaps once per week?
Today's quick lesson is how to use the Gradient Map feature in Photoshop for a more vivid color photograph in two super easy steps.
We're going to use a photo I took last week of Air Force One taking off from Portland International Airport. It's such an amazing airplane, and you should've seen all the massive guys with even more massive guns roaming all over the place.
Here's our starting image:
The first step: in your 'Layers' panel, select 'Gradient Map'
That will turn your image black and white, but don't panic! Step two is to turn the Blending Mode from 'Normal' to 'Luminosity'
Voila! That's it! Here's the final image:
In two very easy steps, you've just turned a flat, not very interesting photograph into a well-saturated and eye popping photo worthy of something other than the trash can :)